How to Upload Images
In SliceVault, uploading images varies slightly depending on whether you’re adding data for a new patient (not yet registered in SliceVault) or adding additional images to an existing patient. Although the way you initiate the upload differs in each case, the steps that follow the same structure:
- Select Visit
- Select Files
- Select Series
- De-identification and Upload
- Assign Patient ID
Important: Users are advised to remain on the SliceVault website during uploads. Navigating away from the site or switching to other applications may slow down the upload process. Closing the SliceVault website during an upload may result in fatal errors. Upload duration depends on your internet connection speed and the size of the data being uploaded.
Starting the Upload Process
Begin the upload process from the repository site.
- Click the “Add Patient” button to start the import process for a patient who has not yet been registered in SliceVault, or
- Locate the patient in the repository, then click the “Add More Images” link next to the correct patient ID to add additional data to an existing patient.
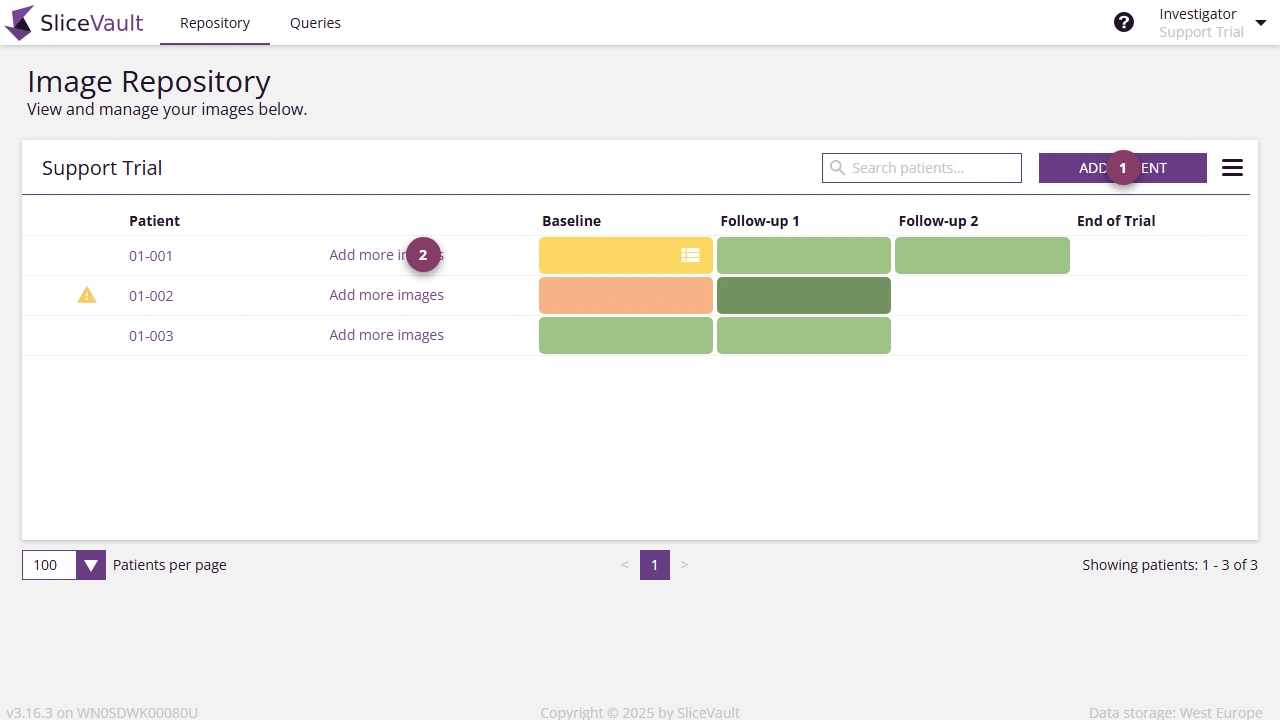
‘Add patient’ Button is Disabled: The “Add Patient” button may be disabled for a different reasons. Most commonly, this occurs because you have run out of pre-assigned patient IDs. Another possible reason is that the option to manually enter patient IDs using free text has been disabled. In either case, please contact your trial administrator or main study contact for assistance.
‘Add More Image’ Link is Missing: If the “Add More Images” link is missing, it is likely because there are no open visits available. To upload images, at least one visit must be unlocked — meaning it has not yet been submitted. If you’re unsure how to proceed, please reach out to your trial administrator or main study contact for assistance.
Step 1: Select Visit
- Start by selecting the visit to which the data will be associated. This is an essential step to ensure that data is correctly labeled and linked to the right visit for analysis. You cannot change this label later.
- After selecting the visit, click next to proceed.
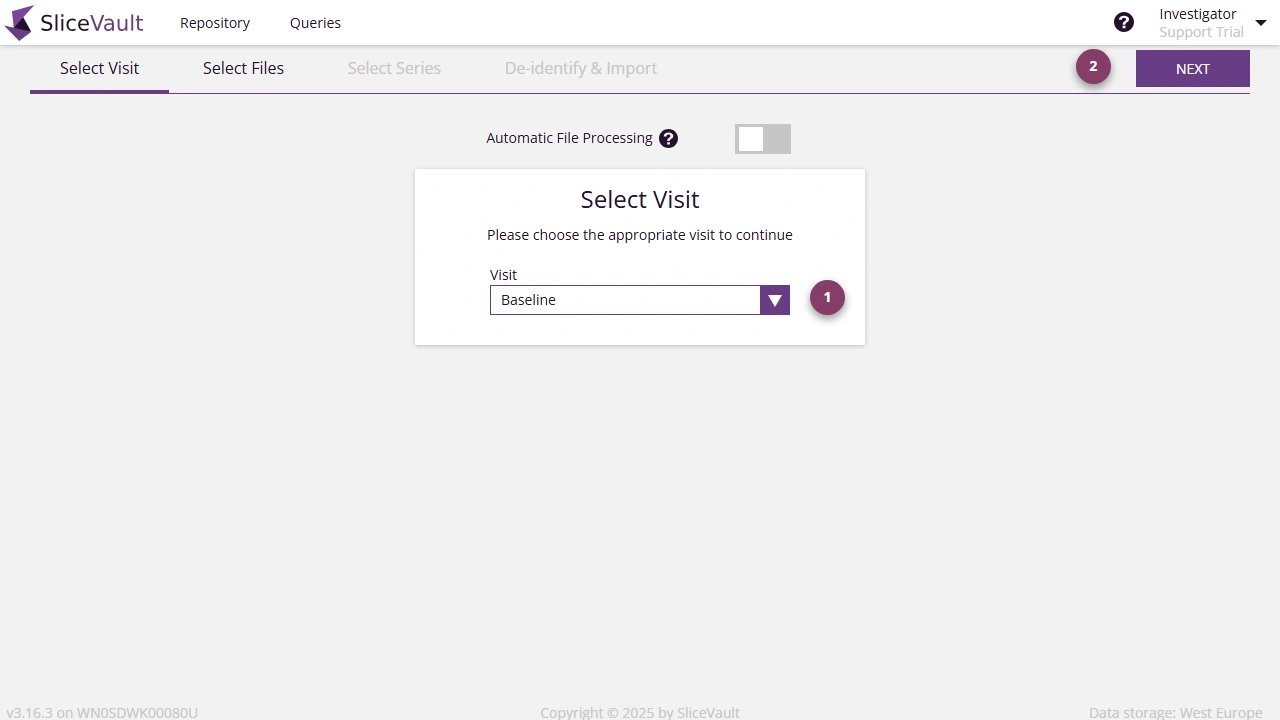
Visit is Missing: If a visit is missing from the list, it is likely because the visit is locked, meaning you are no longer allowed to upload additional images to it. If you need to unlock a visit in order to add more images, please contact your trial administrator or main study contact for assistance.
Step 2: Select Files
Before uploading to SliceVault, make sure your data has been exported from your local Picture Archiving and Communication System (PACS). Since SliceVault does not integrate directly with PACS, users need to follow local export procedures. Contact your local IT system administrator if you need help exporting files from PACS.
- Place files in the upload area by dragging them to the drop zone, or click ‘Choose a file’ to open your file explorer and select files manually.
- Once files are in the drop zone, the ‘Next’ button will be enabled. Click ‘Next’ to proceed.
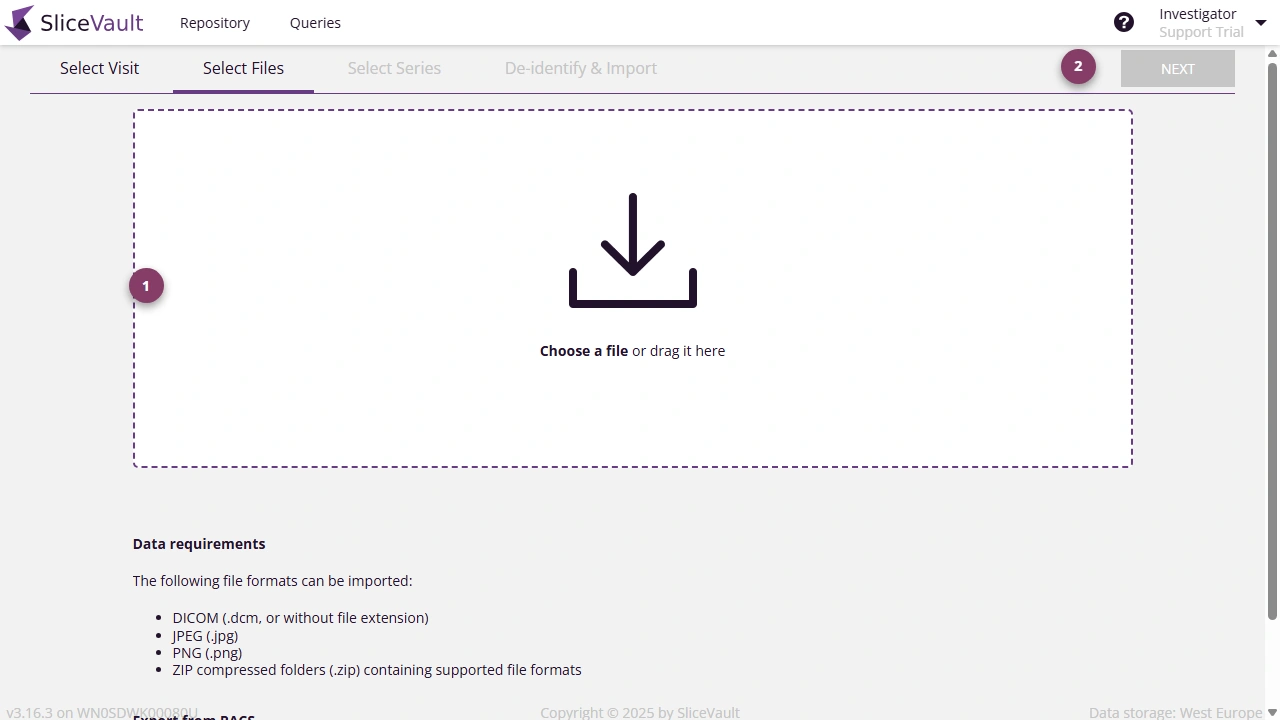
Skipping Files: SliceVault will automatically skip any disallowed or unnecessary files during upload. This includes application files (such as .exe), DICOM directory files, document files, duplicate files, and DICOM files with an unsupported Transfer Syntax UID.
Processing Takes a Long Time: If you select a large volume of data, it may take some time for your browser to finish processing, and for the next button to become active. The duration depends on your computer’s performance. During this step, SliceVault is moving the data into your browser’s temporary memory to prepare it for de-identification and upload.
Step 3: Select Series
- Files are organized by study and series. For each imaging series, use the dropdown menu to select the correct label to ensure correct image labelling and display in SliceVault. The labels available to you depend on the study configuration.
- When a label is selected for all series, the ‘Next’ button will be enabled. Click ‘Next’ to continue.
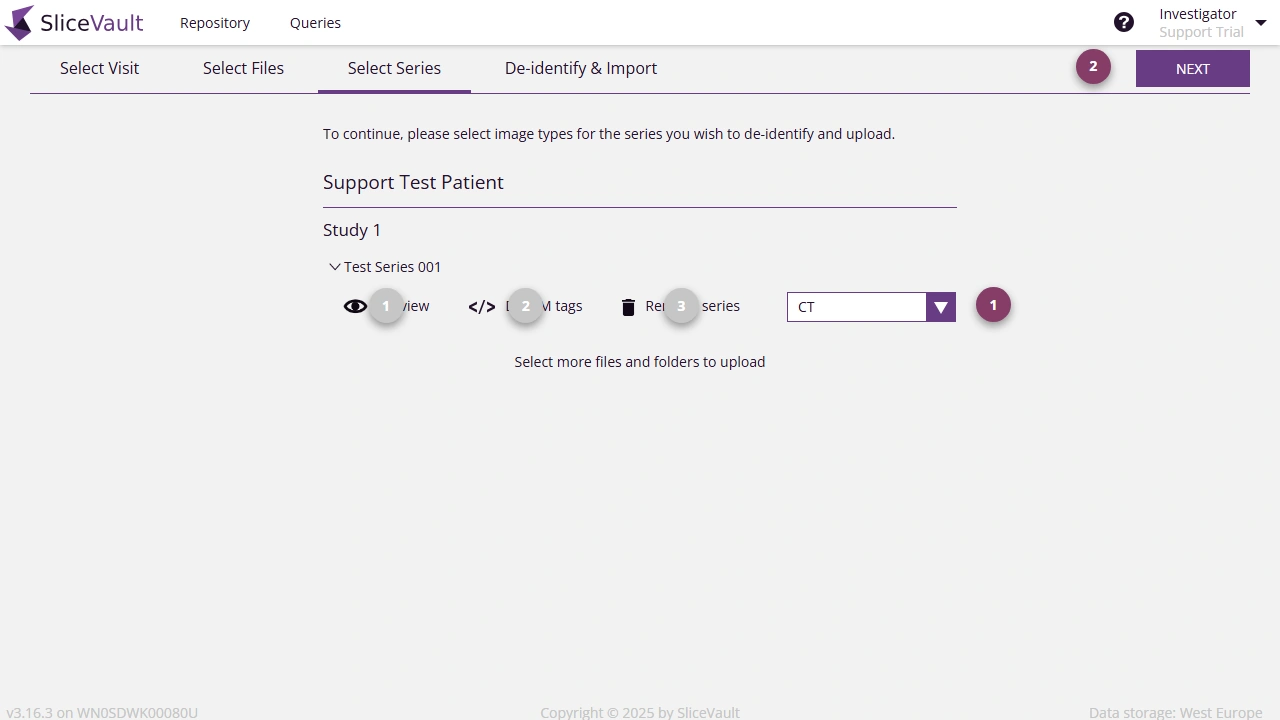
Other Functionalities
- You can preview data in the DICOM viewer to verify that the correct files are selected.
- You can view DICOM tags to compare values before and after de-identification.
- Click to remove any series that you do not wish to upload.
Unable to Select Label: If you are unable to select a label for a specific series, it is likely because the data you are trying to upload is not supported by your study configuration. Please remove the series or contact your study administrator or main study contact for assistance.
Next Button Remains Disabled: If the Next button remains disabled, please ensure that a label has been assigned to all image series.
Step 4: De-identification and Upload
All images are de-identified before being uploaded to SliceVault to preserve patient privacy by removing sensitive Personal Health Information (PHI). The de-identification procedure executes locally in your browser, and combines:
- DICOM tag redaction
- Masking of burned in annotations
- Video masking
DICOM Tag Redaction
SliceVault automatically redacts DICOM tags using a redaction script that conforms to the current DICOM standard. This step is fully automated, and no user input is required.
No Manual Pre-work: You do not need to de-identify data manually before using SliceVault
Masking of Burned-in Annotations
Images that may contain PHI embedded directly in the image pixels (i.e., burned-in annotations) are automatically scanned using OCR technology. If text is detected that could contain sensitive information, you’ll be prompted to review and mask those areas before continuing. When OCR detects possible identifiers, you can apply or adjust masks directly on the image and choose how to handle the redacted content before upload.
For detailed step-by-step instructions, see the Burned-in Annotations Guide.
Post-Upload PHI Masking: If PHI is detected after upload, SliceVault includes functionality to mask images post-upload. Read more here.
Video Masking
When uploading video data, you must ensure that all sensitive identifiers and personal features are hidden in every frame. The process requires manual input, where you draw one or more masks to cover sensitive information using SliceVault’s video radaction tools in your browser. Once masking is complete, SliceVault automatically creates a new video with the applied masks before uploading.
For detailed step-by-step guidance please visit the Video Masking Guide.
Step 5: Assign Patient ID
After uploading data for a new patient, you must assign a patient ID. If you are adding additional data to an existing patient, this step is skipped because a patient id has been assigned already, and you will return directly to the visit dashboard.
- Depending on your study’s setup, you may choose patient id from a list of pre-assigned patient IDs or manually enter a new patient ID using free text. Hereafter you are returned to the visit dashboard.
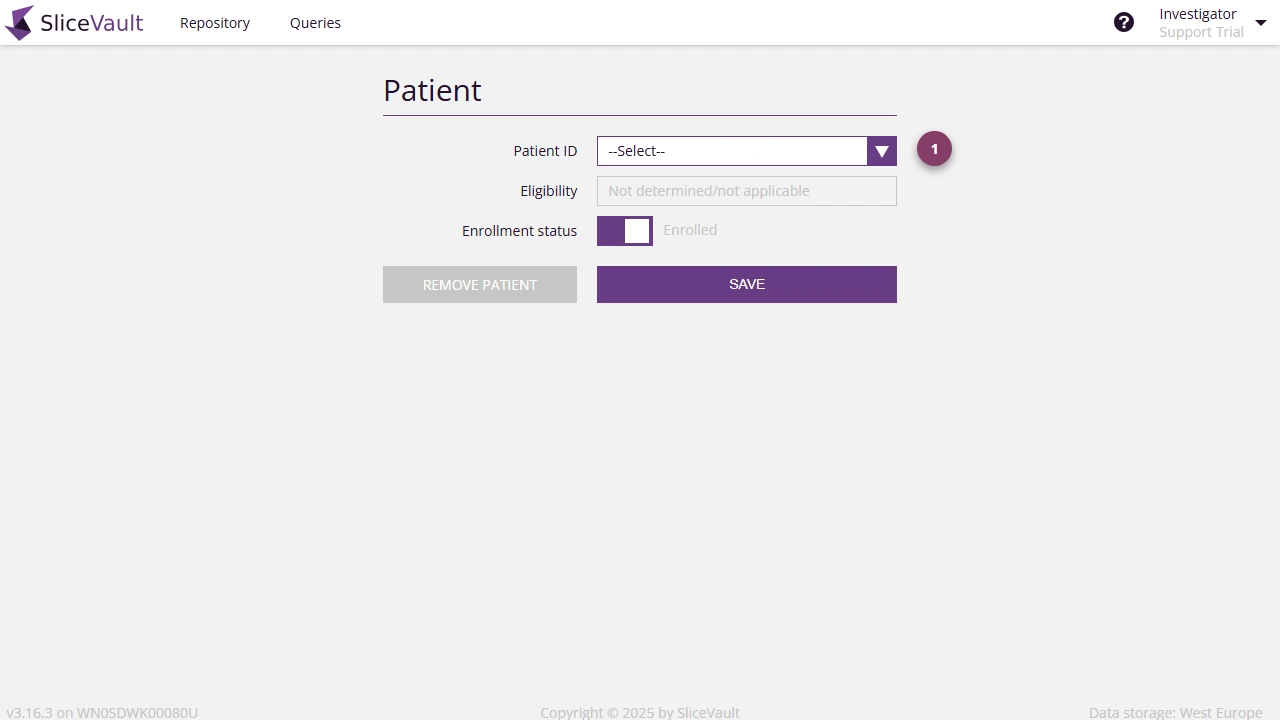
Compliance Note: For privacy reasons, avoid using patient IDs that could potentially re-identify the patient, such as names or social security numbers.
Upload Complete – What Happens Next?
The final step is to fill out the data transfer form (if required) and complete the submission, ensuring that the data is submitted in a timely manner.
Please follow your study protocol to ensure a complete and compliant submission. Please consult your study sponsor or coordinator if you have questions about your submission.
Note: To avoid delays, please ensure that everything is accurate before submission.
Troubleshooting
Post-Upload PHI Masking: In the event that images with PHI is unintentionally uploaded, SliceVault includes functionality to mask images after upload. Read more here.
De-identification Takes Too Long: De-identification is performed locally in your browser. If the process is taking a long time, try uploading the data in smaller batches instead of all at once, or consider using a more powerful device for better performance.
Upload Takes a Long Time: The upload process is entirely dependent on your internet connection speed. If it is slow, try switching to a faster or wired connection for improved performance.
Upload Unsuccessful: SliceVault includes several fail-safe mechanisms to ensure a fast and reliable upload process. However, uploads may still fail if your internet connection is unstable, interrupted, or temporarily lost. To resolve this, try switching to a more stable connection or uploading the data in smaller batches.