Burned-in Annotations
Burned-in annotations are identifiers rendered directly in the image pixels (not metadata), such as patient names, IDs, or timestamps. Before upload, these must be reviewed and masked to ensure privacy and compliance. This process happens locally in your browser, and no raw image data leaves your device until masking is complete. The workflow requires manual input - once you have created the masks and confirmed that all identifiers are covered, SliceVault generates redacted images and proceeds with upload according to your study settings.
Note: Why is SliceVault asking me to mask every CT or MRI slice?
If SliceVault is asking you to review burned-in annotations for every slice, the study may have been exported as PNG, JPEG, or screen captures instead of DICOM. See: Why Is SliceVault Asking Me to Mask Every CT or MRI Slice?
What Must Be Masked
Ensure that all identifiable text and features are masked. This includes:
- Patient identifiers such as name, initials, date of birth, social security number, MRN, or accession numbers
- Study or site names, timestamps, device IDs, and other labels that could identify the subject or site
- Facial features (eyes, nose), tattoos, scars, or other unique physical characteristics
SliceVault automatically scans images for burned-in text using OCR. If possible PHI is detected, you will be prompted to review and mask those areas before upload.
Masking Detected Text
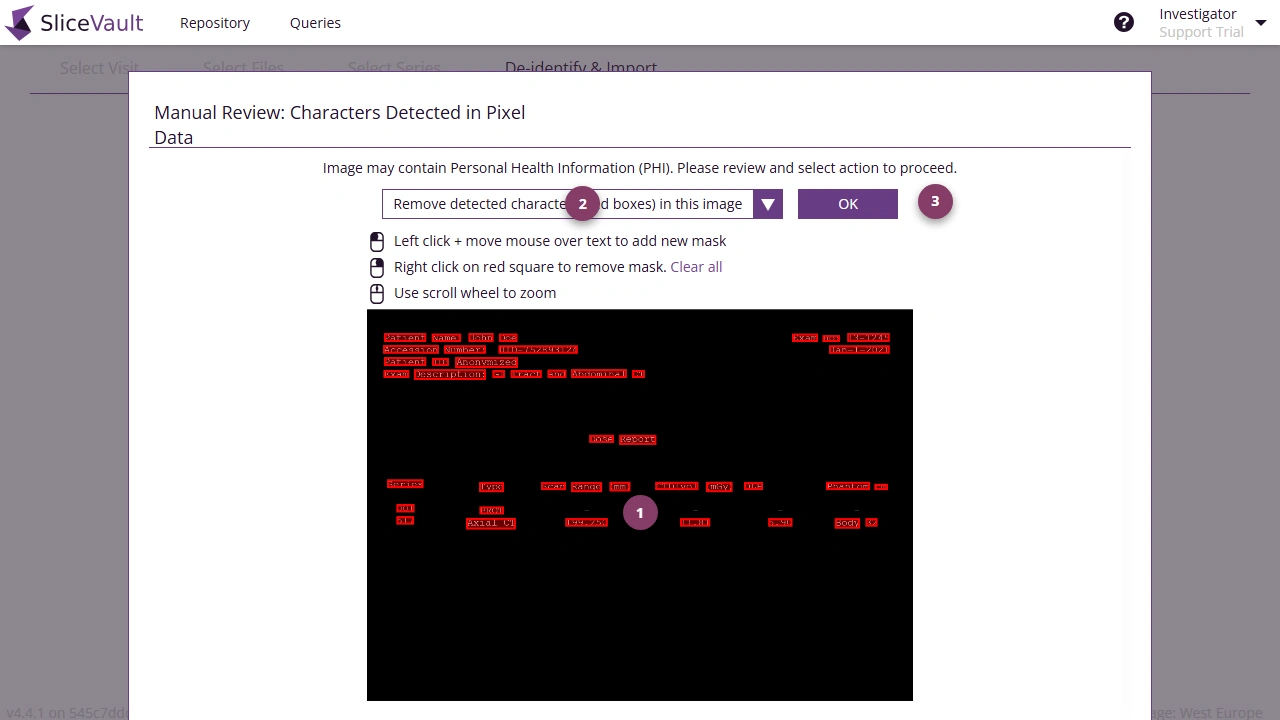
When prompted, follow these steps:
-
Use 1 to review the highlighted areas: Red boxes will appear where OCR has detected possible text. If many red boxes are shown, click the Clear all link to remove all suggested boxes and start fresh. Then use your mouse to draw masks over the areas that actually contain PHI. Each mask will appear as a red box, fully covering the sensitive text or feature. You can add as many masks as needed, adjust their size or position, or remove any that are unnecessary.
-
Use 2 to select the redaction action: Once all areas have been masked, choose the appropriate redaction action to confirm that the sensitive data has been adequately covered.
- Remove detected characters (red boxes) in this image: Removes the masked regions only from the current image before upload.
- Omit this image from upload: Skips the current image. Image is not uploaded.
- Upload image without changes: Uploads the image as-is, without masking.
The following options are only available if the study configuration explicitly allows them:
- Skip manual masking. Auto accept suggestions in all images: Automatically applies OCR-detected masks across all images in the batch. This option re-detects text for each image and applies masks automatically — it does not replicate a single manual mask position.
- Omit all images with possible PHI from upload: Prevents any image flagged by OCR from being uploaded.
- Upload all images without changes: Uploads all images without masking.
-
Use 3 to confirm masking: Once all identifiers are covered, confirm your selection to continue with the upload.
Example – Removing and Creating Masks
Processing and Upload
After confirmation, SliceVault applies all masks directly in your browser. The time required depends on your device’s performance and the size of the image.
Images are processed sequentially — the system masks each image one at a time. Once all images have been masked, they are uploaded together to SliceVault.
Note: This process runs entirely in your browser, and performance depends on your computer’s processor (CPU) and memory (RAM).
Bigger or higher-resolution images will take more time to process.If the process stops unexpectedly, your device may not have sufficient performance. Try the following:
- Use a more powerful computer.
- Close other browser tabs or applications to free up memory.
- Upload images in smaller batches instead of all at once.