Video Masking
Video masking ensures that all sensitive identifiers and personally identifiable features are hidden in every frame before upload. This process happens locally in your browser, and no raw video data leaves your device until processing is complete. The workflow requires manual input —once you have created the masks and confirmed that all identifiers are covered, SliceVault generates the masked video(s) and uploads them securely to SliceVault.
What Must Be Masked
Ensure that all identifiable text and features are masked. This includes:
- Patient identifiers such as name, initials, date of birth, social security number, MRN, or accession numbers
- Study or site names, timestamps, device IDs, and other labels that could identify the subject or site
- Facial features (eyes, nose), tattoos, scars, or other unique physical characteristics
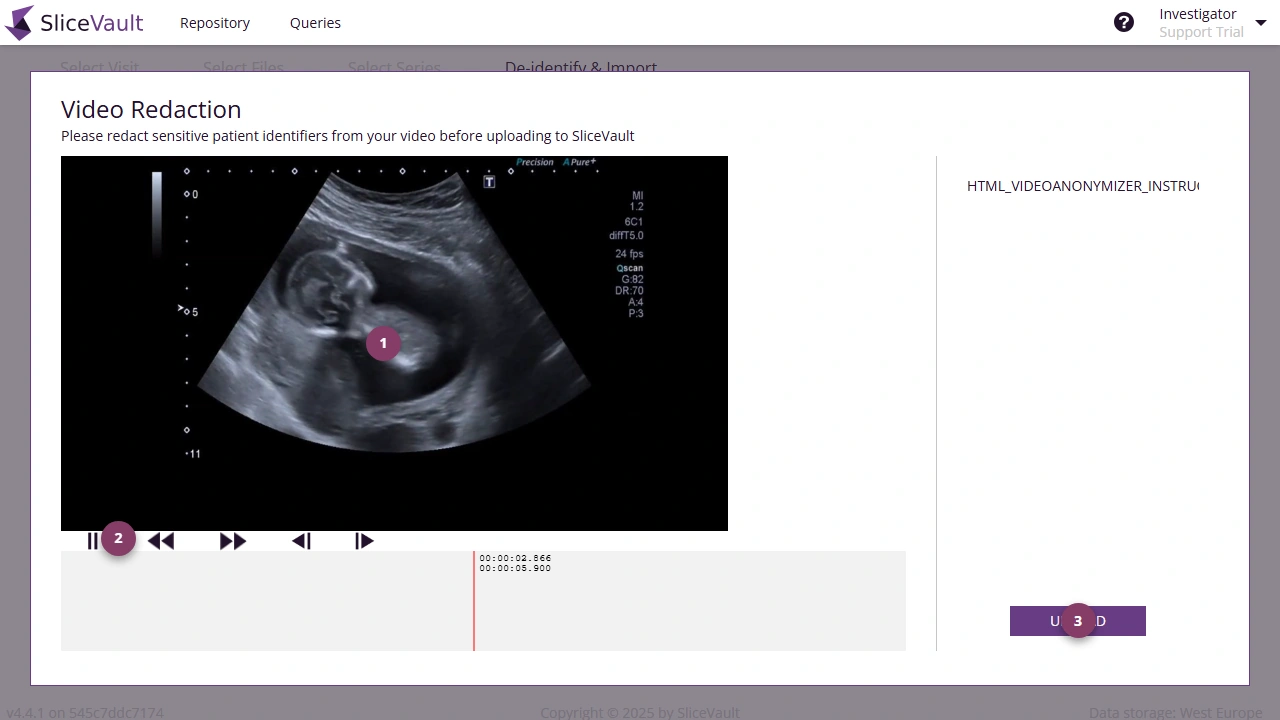
Creating a Mask
When the Video redaction tool opens in your browser:
-
Use 1 to find the identifiers: Use the playback controls to move forward or backward through the video (frame by frame if needed) until you see an identifier or feature (usually in the first frame).
- Use 2 to draw a mask: Using your mouse, click and drag to draw a rectangle over the sensitive area.
A red box will appear — you can move or resize it to make sure it fully covers the identifier.
This mask will stay fixed in place for all following frames.- If new identifiers appear later in the video, go to that frame and draw an additional mask.
- Right-click on a mask to remove it. The removal takes effect from that frame onward.
- Use 3 to confirm and upload. Once all identifiers are covered, click Upload to proceed.
Example 1 – Creating a Single Mask
Creating a Dynamic (Moving) Mask
When the identifier moves or changes size in the video:
-
Locate the frame where the identifier is no longer fully covered: Use the playback controls to move forward through the video until you see that the mask no longer covers the identifier.
-
Adjust the mask: Pause the video, then click and drag the mask to its new position or resize it so that the identifier is fully covered again. This creates a key frame, which defines a new position for the mask at that point in the video.
-
Automatic interpolation: Between key frames, the system automatically morphs the mask’s position and size to follow the movement smoothly. You can add as many key frames as needed to maintain full coverage across the video.
-
Verify full coverage: Play through the video and stop wherever the mask drifts. Adjust or add new key frames as needed until the coverage is perfect across all frames.
-
Confirm and upload: When every identifier is properly covered throughout the entire video, choose Upload to proceed.
Example 2 – Creating a Dynamic Mask
Processing and Upload
After clicking upload, SliceVault performs all masking and video rendering directly in your browser. The system creates a new video with the applied masks and prepares it for upload. The time required depends on your device’s performance and the length of the video.
Videos are processed sequentially — the system masks each video one at a time. Once all videos have been masked and the new versions have been created in your browser, they are uploaded together to SliceVault.
Note: This process runs entirely in your browser, and performance depends on your computer’s processor (CPU) and memory (RAM).
Longer or higher-resolution videos will take more time to process.If the process stops unexpectedly, your device may not have sufficient performance. Try the following:
- Use a more powerful computer.
- Close other browser tabs or applications to free up memory.
- Upload videos in smaller batches instead of all at once.